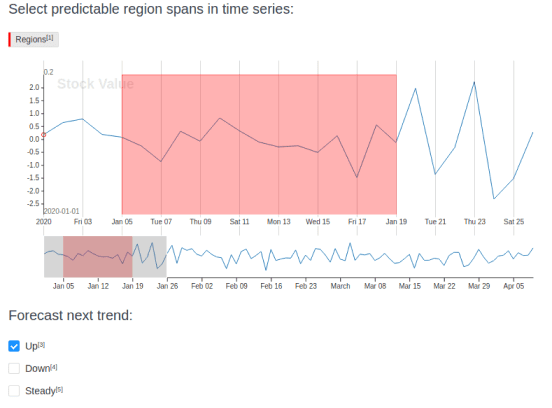
Time Series Labeling

Label any type of time series data using this generic template.
Interactive Template Preview
Labeling Configuration
Example project configuration for multivariate time series labeling:
<View>
  <TimeSeriesLabels name="label" toName="ts">
    <Label value="Run"/>
    <Label value="Walk"/>
  </TimeSeriesLabels>
  <TimeSeries name="ts" valueType="url" value="$csv_url" timeColumn="time">
    <Channel column="sensorone" />
    <Channel column="sensortwo" />
  </TimeSeries>
</View>
About the labeling configuration
All labeling configurations must be wrapped in View tags.
Use the TimeSeriesLabels control tag to highlight and label specific spans of a time series graph:
<TimeSeriesLabels name="label" toName="ts">
    <Label value="Run"/>
    <Label value="Walk"/>
</TimeSeriesLabels>
The tag is linked to the TimeSeries object tag with a toName parameter.
Use the TimeSeries object tag to display time series data and channels:
<TimeSeries name="ts" valueType="url" value="$csv_url" timeColumn="time">
    <Channel column="sensorone" />
    <Channel column="sensortwo" />
</TimeSeries>
The valueType="url" parameter means that Label Studio expects links to CSV files in JSON-formatted tasks. The timeColumn parameter specifies the column in your dataset to use as the X-axis for time. If you don’t specify a timeColumn, Label Studio uses incremental integer values as the X-axis: 0, 1, 2, ....
Input data
Example CSV file input for the labeling configuration looks as follows:
time,sensorone,sensortwo
0,10,20
1,20,30
2,30,40
Related tags
Input formats
Label Studio supports several input types for time series:
- CSV with or without a header
- TSV with or without a header
- JSON
CSV Example
For example, for a CSV file with 3 columns:
time,sensorone,sensortwo
0.0,3.86,0.00
0.1,2.05,2.11
0.2,1.64,5.85
Then, create a JSON file that references a URL for the CSV file to upload to Label Studio:
[ { "data": { "csv_url": "http://example.com/path/to/file.csv" } } ]Because the JSON file references a URL, and the URL is specified in a field called csv_url, set up the TimeSeries object tag like follows in your labeling configuration:
<TimeSeries name="ts" valueType="url" value="$csv_url" sep="," timeColumn="time">
    <Channel column="sensorone" />
</TimeSeries>
In this case, the <TimeSeries> tag has the valueType="url" attribute because the CSV file is referenced as a URL. See How to import your data.
TSV Example
If you’re uploading a tab-separated file, use the sep attribute on the TimeSeries tag to specify tab separation.
For example, set up the TimeSeries object tag like follows in your labeling configuration:
<TimeSeries name="ts" valueType="url" value="$csv_url" sep="\t" timeColumn="time">
    <Channel column="0"/>
</TimeSeries>
Headless CSV & TSV
The main difference for the headless CSV/TSV usage is another way to name <Channel> columns. Since the file has no header and nothing is known about the column names, use a column index instead. For example, to use the first column as a temporal column, specify <TimeSeries timeColumn="0" ... >. The same is true for the column attribute in <Channel> tag.
JSON
All tasks in Label Studio are stored in JSON and this is the native format for Label Studio.
valueType="url"When you use
valueType="url"for TimeSeries tag and import a CSV file, Label Studio automatically creates a JSON task with the body like this example:{ "csv": "http://localhost:8080/data/upload/my-import-file.csv" }valueType="json"You can also use Label Studio JSON format directly by creating and import JSON structured like the following example, where each key specifies the time and channels:
{
  "ts": {
    "time": [
      15.97, 15.85, 25.94
    ],
    "sensorone": [
      13.86, 29.05, 64.90
    ],
    "sensortwo": [
      21.00, 15.18, 35.85
    ]
  }
}
Output format example
Annotators add labels to time series tasks. Label Studio represents each completed annotation with a JSON structure. Each annotation has a result field that looks like the following example for time series labeling projects:
{
  "annotations": [{
    "result": [
      {
          "value": {
              "start": 1592250751951.8074,
              "end": 1592251071946.638,
              "instant": false,
              "timeserieslabels": [
                  "Run"
              ]
          },
          "id": "S1DkU7FSku",
          "from_name": "label",
          "to_name": "ts",
          "type": "timeserieslabels"
      },
      {
          "value": {
              "start": 1592251231975.601,
              "end": 1592251461993.5276,
              "instant": false,
              "timeserieslabels": [
                  "Run"
              ]
          },
          "id": "XvagJo87mr",
          "from_name": "label",
          "to_name": "ts",
          "type": "timeserieslabels"
      }
    ]
  }]
}
Enhance this template
If you want to enhance this template, you can make a number of changes to the tag configurations.
Multiple time series in one project
If you want to use multiple time series datasets in one project, you must make your CSV files available as URLs and import a JSON-formatted file with tasks that reference those CSV files.
For example, for a task that can reference two sets of time series data:
[ { "data": { "csv_file1": "http://example.com/path/file1.csv", "csv_file2": "http://example.com/path/file2.csv" } } ]You could then set up the following labeling configuration to reference each CSV file and be able to label them both on the same labeling interface:
<View>
  <Header value="First time series" />
  <TimeSeriesLabels name="lbl-1" toName="ts-1">
    <Label value="Label 1" />
  </TimeSeriesLabels>
  <TimeSeries name="ts-1" timeColumn="0" value="$csv_file1">
    <Channel column="1" />
  </TimeSeries>

  <Header value="Second time series" />
  <TimeSeriesLabels name="lbl-2" toName="ts-2">
    <Label value="Label 2" />
  </TimeSeriesLabels>
  <TimeSeries name="ts-2" timeColumn="0" value="$csv_file2">
    <Channel column="1" />
  </TimeSeries>
</View>
The value parameter in the TimeSeries tag is used to refer to the JSON key with the CSV file URL.